Pages

Saturday, June 12, 2010

Grilled Beef Kabobs


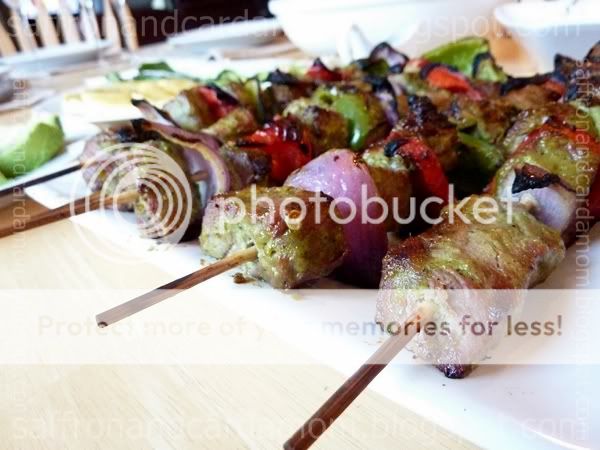
One thing I like most about the warm summer months is the chance to take advantage of the grill.  Today we grilled beef kabobs marinated overnight in a scallion-parsley-jalapeno sauce.  Not only is it quite tasty, it's also very simple to make.  I used top round steak today but I recommend sirloin for a more tender kabob.  We enjoyed the kabobs with grilled scallions, grilled pineapple and a garden salad dressed with homemade garlic-balsamic vinaigrette.  We paired it with Paringa sparkling Shiraz, which has been making a regular appearance at our house lately.  The only wine shop I've been able to find it at locally is Vino 100 in Newburgh.

Please keep in mind that the recipe below includes estimates of amounts as I never measure out ingredients when I cook...you know how it is, a little bit of this, a little bit of that.


Ingredients
1 lb beef cubed (preferably sirloin)
3 scallions chopped
1 handful of parsley 
1 jalapeno chopped
1 tablespoon light soy sauce
1 tablespoon brown sugar
juice of one lime
1 tablespoon canola or olive oil
red onion cut into one inch squares
red bell pepper cut into one inch squares
green bell pepper cut into one inch squares
4 or 5 wooden skewers soaked in water
salt
pepper

Directions
Puree in a blender the scallions, parsley, jalapeno, lime juice, brown sugar, soy sauce and oil. Season beef with salt and pepper.   Marinate the beef in the puree for 1 hour or up to 24 hours.  Keep the marinated beef chilled in the refrigerator. Remove the beef from the refrigerator for about 15 minutes before grilling.  Thread the marinated beef cubes onto the soaked skewers alternating them with the onions and bell peppers.  Grill for about 10 minutes or to your preferred doneness.  Be sure to turn the kabobs during this time to ensure that all sides are browned.  Let rest for a few minutes before serving.

Monday, May 31, 2010

Weekend with my sister


My sister came over Sunday afternoon and stayed until Monday. All we did was go shopping while she was here. And when we weren't shopping we were cooking and eating!  In the picture above you'll see what we had for lunch on Sunday, grilled beef burgers with blue cheese and caramelized onions with a side of fries. The addition of blue cheese and caramelized onions to the burgers was her idea and what a great idea it was...yum it was so good. 

Here's some of what else we had:

White sangria

Grilled jerk chicken

Ice cream sundaes with hot caramel and fudge sauce.
Our mom's grilled buttery jalapeno & onion omelet breakfast sandwich prepared by me.

Wednesday, May 26, 2010

spicy herb turkey burger


Do you ever purchase herbs for a recipe then end up discarding the unused portion because it wilts in the fridge? I can't stand when that happens, perfectly good produce going to waste. Some herbs I do chop up and freeze for later use like cilantro, parsley, scallions, and chives. I also freeze curry leaves when my mom brings them for me picked from her many plants she has at her home. There is one herb that I've never tried freezing because it seems too delicate for the freezer, that's basil.

One way I like to use up extra basil is in my spicy herb turkey burgers. I came up with it one day when I happened to have the following ingredients in my fridge which I wanted to use up, jalapeno, parsley, basil and red bell pepper. I just minced it all up added some minced onion, garlic, salt, pepper, smoked sweet paprika, crushed fennel seeds and tomato paste to the ground turkey meat, formed it into patties and grilled them off. Now I make turkey burger this way all the time. It is so delicious; I especially like the kick from the jalapeno and the slight smokiness from the paprika.

Sunday, May 23, 2010

Eggplant


I was not in the mood to cook today but I had an eggplant on the counter which had been purchased two days ago just begging to be cooked. I find that eggplant is one of those foods that I have very limited uses for. Well there is eggplant parmesan and baba ganoush. In our house we also make a guyanese eggplant stew made with potatoes and shrimp, guyanese eggplant choka or what I made today indian curried eggplant. Do you have any good eggplant ideas to recommend? I need something new to add to my repertoire.

Wednesday, May 19, 2010

Almond milk


Looks like a glass of milk right? It is actually homemade almond milk.

I grew up drinking regular full fat cow’s milk. You know the kind that comes in the big plastic jug with the red cap? About six years ago as I started educating myself about eating organic and eating healthier, I switched to organic fat free milk. Then last year, I started drinking soy milk every morning with my cereal in order to cut down on the amount of dairy in my diet. Well, that came to an abrupt and paranoid end when I read an article about the possible connection between soy milk and breast cancer. I then switched back to organic fat free cow's milk in my cereal. That is until a few weeks ago when I read the following article by Dr. Mark Hyman in the Huffington Post:

http://www.huffingtonpost.com/dr-mark-hyman/dairy-free-dairy-6-reason_b_558876.html

Suffering from paranoia again I tried rice milk and hated it. I had heard about almond milk but couldn't find it in my local supermarket. So, I googled "almond milk recipe" and came up with several sources. They all had basically the same recipe, which is to soak one cup of raw almonds overnight then blend the soaked almonds with 4 cups of water until liquefied. Then strain to remove the almond meal. I just discard the almond meal, but apparently others use it in baking. I also add a splash of vanilla extract. I keep it chilled in the refrigerator and try to use it up in under a week.

It tastes great in cold cereal. It has a mild flavor so I like it even better than soy milk. I also tried it as cold chocolate milk which was another hit. To me it is not a good option for tea, coffee or hot chocolate, so I will not be giving up dairy all together. I just can't live without milk in my tea.

I've been making and having almond milk with my morning cereal for two weeks now and am pretty sure this is something I will continue to do...until of course something terrible comes out about almond milk.

Sunday, May 02, 2010

Tacos


Homemade tacos from scratch are so much more satisfying than the store bought variety. If you try to make the tortillas yourself you'll never buy premade again...believe me. I just follow the directions on the back of the masa harina package. It's not difficult at all. I made my beef filling in the Crockpot and topped the tacos with salsa, sliced avocado and grated sharp cheddar cheese. This taco is light and fresh, perfect for spring.


Ingredients
Soft corn tortillas (follow direction on masa harina package)
Beef filling
1.25lbs. beef chuck cubed
Salt
Ground black pepper
Dry thyme
2 ancho chilies soaked, stems and seeds removed and pureed into a paste with 1/4 cup of the soaking liquid
Canola oil
1 onion diced
2 garlic cloves diced
1/2 teaspoon ground cumin
1/4 teaspoon paprika
1 tsp tomato paste
1 tsp brown sugar
1/4 tsp instant coffee powder
1/4 tsp unsweetened cocoa powder
1/4 tsp cayenne pepper

Salsa
2 jalapeno peppers, seeded and diced small
1 onion diced fine
1 small bunch cilantro diced fine
1 large tomato, seeds removed and diced fine
Juice of 1 1/2 lime
Salt

Additional toppings
Shredded sharp cheddar cheese or any cheese you like
Sliced ripe avocado

Directions

Beef filling:
Season the beef cubes with salt, pepper and thyme. Heat just enough oil to coat the bottom of a frying pan and sear the beef cubes until browned. Remove the beef pieces and transfer to the Crockpot. Using the same frying pan add a bit more oil (enough to coat the bottom of the pan) and sauté one diced onion and garlic until translucent. Add ancho chili puree and tomato paste and cook until the oil separates. Add cumin, paprika, brown sugar, cayenne, instant coffee powder, cocoa powder and salt. Cook this together for another minute. Pour this sauce over the beef which you placed in the Crockpot earlier. Stir it all together set your Crockpot on high for 4 hours or low for 6 hours. When the beef is fork tender just shred the beef pieces with the back of a fork and stir together with the sauce in the Crockpot.

Salsa:
Mix onion, jalapeno, cilantro, tomato, lime juice and salt. Keep chilled until ready to use.

Fill soft corn tortillas with beef, salsa, sliced avocado, and shredded cheese.

Tuesday, April 06, 2010

Roast Chicken


This is a very easy recipe for roast chicken. The aroma that wafts through the house as it cooks will make your mouth water. I think the key to this recipe is that once it's in the oven, it should be left alone. When I first started making roast chicken I would open the oven door several times to check on it, baste it, and re-season it. It never turned out right that way. Now that I leave it alone and let it do it's thing, I get a perfectly cooked chicken with a crispy skin...yum.

We paired the chicken with Ochoa Virua Chardonnay. It's a Spanish dry white wine containing 70% viura and 30% chardonnay. It's light and citrusy and went well with roast chicken. I picked it up at Vino 100. If you live in the Newburgh, NY area check it out. The staff, atleast the woman that was there when I went, was approachable and helpful.


Ingredients
Whole chicken
Teaspoon extra virgin olive oil
Half a teaspoon melted butter
Salt
Pepper
Dry rosemary
Dry thyme

Directions
Preheat oven to 450 degrees.

Combine olive oil and butter. Brush the chicken and its cavity with olive oil and butter mixture. Season the outside and cavity of the bird generously with salt. Then repeat with ground black pepper, dry rosemary and thyme.
Place the chicken breast side down in a heavy roasting pan or a cast iron skillet.
Roast chicken in 450 degree oven for 45 minutes to one hour.
Let it rest for five to ten minutes before carving.


I served it with creamy mashed potato with minced chives and sautéed spinach with garlic. By the way, I apologize for the not so attractive picture of the chicken. I forgot to turn it over onto its "pretty" side before I took the picture...oops.

Tuesday, March 30, 2010

Feeling Sad

We've been sad here at saffron and cardamom. See "House & Home" for details.

We're starting to feel a bit better and will be adding a new food post soon.

Sunday, March 14, 2010

Naan


I'm a bit nervous about this post. Why you ask? Well, I'm afraid that if anyone tries my recipe for naan they will be very upset with me. Let me explain. The way I make this naan is a bit messy, challenging, definitely unconventional and maybe even dangerous. However, if you try it and stay the course, using the utmost caution during the baking process I think you'll be happy with the end result. This naan turns out toasted golden brown on the outside and warm and soft on the inside. In my opinion it's as close as I could get without an actual tandoor oven.

You'll need a pizza stone for this recipe.


Ingredients
1 packet dry yeast
1/2 tablespoon sugar
1/4 cup warm water (not hot)
2 cups flour plus 3-4 teaspoons
1/2 teaspoon salt
2 tablespoons fat free yogurt
1 tablespoon oil or ghee
1/4 cup warm fat free milk
Extra oil for handling wet dough
butter or ghee
patience
persistence
Makes 4

Directions
Slowly stir together yeast, sugar and water in a bowl and let rest for a few minutes to bubble up and become active.

Mix all dry ingredients together (only use the 2 cups of flour). Then add wet ingredients including yeast mix with your hands.

This is where you'll be annoyed with me, because the mix will be very wet and messy. That's because my liquid to dry ratio is greater than most recipes. I did this because I felt it would result in a softer naan.

At this point, gather up your patience and add the 3-4 extra teaspoons of flour. Slowly add it little by little and just dust it over the top of the messy wet flour mound and each time gather it up from the bottom of the bowl. Gently turn it over then dust some more. Continue until the extra flour is used up.

I don't believe in over kneading dough when making naan and paratha (which I'm looking forward to posting soon). I just mix/knead the mixture together very gently. Actually at this point it's virtually impossible to knead because it’s so wet. Next grease another large bowl with about a teaspoon, maybe a bit more of extra oil and scrape the wet dough into this bowl. Now wash your hands clean, and then rub some oil on your hands so you can handle the dough. Take the dough gently away from the edges of the bowl with your hands and turn it over so that the whole mass gets lightly oiled. Now cover it with a damp warm towel and leave it to proof.

Here's where my unconventional steps comes in. You don't even have to do this first part because your dough will probably proof just fine without this step. It was a cold damp day when I made this dough so I was afraid my dough wouldn't proof the way I wanted it to. So…I placed the bowl of dough on my kitchen table next to a space heater set to 75 degrees Fahrenheit, with its fan blowing near the bowl but not at it. There I said it...I know it sounds strange but it worked. So don't judge me. Like I said if you don't have a space heater just let your dough rise like normal people do. If you do use a space heater, use common sense and do not leave it unattended. I've heard of people proofing dough in a warm oven that's been turned off. Unfortunately, that has never worked for me.

The dough should take about half an hour to proof maybe longer. You know it's proofed when it's doubled in size. When it has doubled in size, get ready to get messy again.

Brush the inside of 4 large cereal bowls with oil. Rub your hands with oil again and punch the dough down. Gather the dough together and separate it into four equal portions. You'll probably be angry with me here also because the dough will still be sticky. If you have enough oil on your hands then handling the dough will be much easier. Place each of the portions in the greased cereal bowls, cover with warm towels and allow to proof again, about 30 minutes.

Now comes the dangerous part. Turn your oven up as high as it will go and place the pizza stone in the oven. Allow the pizza stone to heat up. My oven goes up to 500/broil. When you feel your oven has reached a high enough temperature, get suited up with your best oven mitt. I'm serious, use the heavy duty kind that goes all the way up your arm. If you don't have one, don't even attempt this.

While wearing your heavy duty oven mitt, remove the pizza stone and place on your stove top. Take one of the cereal bowls, punch down the proofed dough, and remove it to a greased surface. Be creative here, you can use a wooden cutting board lined with wax paper which is greased or even your counter top brushed with some oil. I used a plastic cutting board with a very smooth surface. The key is to use a surface that will not allow the dough to stick to it.

Spread/stretch the dough flat into a long naan shape, not too thick and not too thin. Remove the dough from the greased surface and transfer to the pizza stone. The key here is to work quickly and limit the distance you have to walk from where you're stretching the dough to the oven. This is because as you travel with the dough it will continue to stretch and be difficult to handle. After placing the dough on the pizza stone wear your oven mitts again and place the pizza stone in the oven. Let the naan puff up for a couple of minutes.

Then while wearing your oven mitt, remove the pizza stone and place it under your broiler for about a minute. Please be very careful during these steps because you can easily burn your hands or drop the pizza stone on your toes. Also get any pets or children who may be under foot out of the kitchen while you do this. After about a minute, maybe less you'll see that the top of the naan has turned golden brown. Remove the pizza stone (while wearing those oven mitts) and place back on stove top. Use a spatula to transfer the cooked naan to a plate and brush with butter or ghee. If the naan is cooked through it should easely lift off the pizza stone. Repeat with the other three portions of dough.

So there it is. After reading that if anyone tries this recipe, I'll be very surprised. The naan turned out pretty darn good though! It would go well with lamb curry, vegetable korma, any curry really.


While preparing for this post I've looked at many different naan recipes both online and in my cookbooks. I see that some use only yogurt and some use only milk, others use milk and egg. I used yogurt and milk because I always only have fat free versions of both in my fridge. I feel if I add the yogurt along with the milk it gives the dough some more substance. Not sure if this is really true as I've never tried it with milk or yogurt alone.

Friday, March 12, 2010

Vegetable Korma


Several days ago I was standing in the international food isle at my local supermarket looking for inspiration for my lamb shanks recipe.

As I stood browsing through "Spanish" spices, standing just next to me was a woman studying and examining prepackaged "Indian" meals. I had once tried the very same vacuum sealed, ready to eat microwavable meals she was attempting to select from; cardboard boxes of items like palak paneer, dal, curried chickpeas etc. all stored at room temperature. They tasted absolutely terrible, worse then terrible. I felt compelled to warn her and I did. She mumbled something about her family really liking vegetable korma, quickly put the packet of korma back on the shelf and rushed away looking disappointed that I had just squashed her quick and easy dinner plans.

It occurred to me that vegetable korma is probably up there with butter chicken as most frequently ordered dishes at Indian restaurants. It's really not that hard to make at home.

I've posted today my version of vegetable korma. Now keep in mind, korma is supposed to be a slowly braised meat or vegetable curry made with yoghurt, cream or coconut milk. The south Indian in me prefers coconut milk. I'm using frozen vegetables and my recipe is not slowly braised so I'm not claiming that it's authentic. Tonight we had it with homemade naan (which I'll post next). This korma also goes really well with appam (Kerala pancake made with rice flour and coconut milk).


Ingredients
Canola oil
2 generous pinches of mustard seeds
2 generous pinches of cumin seeds
3 green cardamom pods bruised
One inch piece of cinnamon stick
3 whole cloves
1/2 onion diced
1/2 teaspoon ginger minced
2 large garlic cloves minced
2 green chilies chopped
~6 curry leaves
1 1/2 teaspoon toasted and ground coriander seeds
1 teaspoon toasted and ground cumin seeds
1/4 teaspoon turmeric powder
1/8 teaspoon chili powder (if you want it hotter add more)
1 teaspoon tomato paste
Handful of raw cashews (about 22)
7 oz. coconut milk
12 0z. Frozen veggies (which contain cauliflower, and carrots)
1/2 cup of frozen cut green beans
1/2 cup frozen green peas
2 medium potatoes peeled cut to same size as other veggies
Salt
1/8 teaspoon black pepper
Water

Directions

Boil cut potatoes in salted water until fork tender and set aside.

Boil the cashews in water for about 5 minutes. Then blend the cashews with a few spoonfuls of the boiling water into a paste, set aside.

Heat enough oil to coat the bottom of a pan. When the oil is hot, add mustard seeds. When the mustard seeds begin to crackle and pop, add the cumin seeds, cardamom, cinnamon, and cloves. Fry this mixture until it gives off a nutty aroma.

Add onions, garlic, ginger, green chilies, and curry leaves. Season with salt, and continue to fry until onions are translucent and begin to lightly brown at the edges. Add ground coriander, cumin, turmeric, chili powder and black pepper and season with salt. Continue frying, and control the flame as you cook - don't let it burn.

Add tomato paste and continue frying, when the oil and tomato paste begin to separate add the cashew paste and stir together and continue to heat together. Now add the coconut milk, season with salt and mix together and heat through, keep the heat low so the sauce doesn't boil too much and separate.

Add the cooked potatoes, and all frozen vegetables. Continue to cook, slowly simmer until veggies are heated through. If the sauce is too thick add some more water and simmer longer. You can even add more coconut milk. Try not to add too much water though to avoid the flavors from becoming too diluted. Check again for salt. I have not put how much salt I used because I salt and taste as I go. I encourage you to do the same. This way you'll add the amount of salt appropriate for your taste.

You can also add some chopped cilantro at the end. I haven't because I wanted the curry leaves to stand out.

Thursday, March 04, 2010

Braised Lamb Shanks


I love it when an experimental recipe turns out well. That's what happened last night. I went out on a limb and purchased lamb shanks, a cut of meat that I've never cooked before. I am also using ancho chilies for the very first time.

The whole idea came about because I had a bottle of Paringa Sparkling Shiraz that I wanted to open and try - another thoughtful gift from my sister. See Poor Girl Gourmet for a detailed post on this wine. I figured beef or lamb would go well with it and I just cooked beef the other day so lamb it was. The ancho chilies have a fruity almost raisin or prune scent to it, so I hoped it would be a nice match for the Shiraz.

The lamb turned out moist and tender and just fell off the bone after two hours of braising. The sauce that resulted was so delicious over mashed potato. It tasted like a rich and silky gravy. The Paringa was a hit too. Shiraz is one of K's favorite wines. I find it a bit too strong for me unless I'm having it with a nice grilled steak. K was a bit hesitant, he kept teasing that it was a wine cooler before he tried it. I'm no wine connoisseur, so all I can say is "I like it". The bubbly fizz made it light and pleasant to drink.

Just a few notes for next time...I may use 3 or 4 ancho chilies so the ancho chili flavor will have more of a presence and I may add a pinch or two more red pepper flakes. Either that or leave the seeds in one or two of the ancho chilies. Other than that this recipe was a success and definitely a keeper. I may try it with beef short ribs next time. 

I just had leftovers and it tastes even richer and even better the next day.


Ingredients

2 lamb shanks (~2.5 lbs.)
Olive or canola oil
2 ancho chilies
1 onion chopped
4 large cloves garlic chopped
1/2 teaspoon dried rosemary
1/2 teaspoon dried thyme
1 teaspoon salt
1 teaspoon ground black pepper
3/4 tablespoon granulated sugar
3 tablespoons tomato paste
32 ounce vegetable stock
1/4 cup red wine
1 generous pinch of red pepper flakes

Directions
Soak the ancho chilies in boiling water for about 20 minutes or until they are soft. Remove the stems and seeds and blend them with some of the soaking liquid until you have a smooth thick puree.

Season lamb shanks with salt, black pepper, rosemary and thyme. Heat enough oil to coat the bottom of a large heavy bottom pot. When the oil is hot, begin to brown the lamb shanks on all sides until they get a nice golden brown sear. Be careful and control the flame to avoid burning the rosemary and thyme. Remove the shanks and set aside.

Sauté the onion and garlic in the same oil. Season with a generous pinch of extra salt and the sugar. When the onion and garlic are translucent and slightly beginning to brown add the ancho chili puree. Fry this together for about a minute. Add the tomato puree and fry this for another minute or two.

Return the lamb shanks to the pot; add the vegetable stock and wine. The liquid should come halfway up the sides of the lamb shanks. Turn the flame high, when the liquid begins to boil, cover the pot and turn the flame low.

Leave the lamb to cook for about 2 hours. Periodically stir and check on the shanks, turn them to avoid sticking and burning. Towards the end of the cooking time taste the sauce for salt and add more if you feel it needs it. I added more salt and ground black pepper. After two hours, remove the lamb shanks from the braising liquid and set aside. Use a hand blender to blend the liquid smooth until the sauce clings to a spoon. Then return the lamb shanks to the liquid and simmer the sauce on a low flame for a few minutes. Skim the fat off the top of the sauce as best as you can. Serve the lamb shanks over mashed potatoes and topped with the sauce.

Monday, March 01, 2010

Spicy Fried Beef


The dish that I'm posting today is not a saucy type curry; it's a Kerala style dry fried curry. The recipe is my attempt at recreating the flavors I remember from my mom's recipe. The extra step of frying, while seemingly over-indulgent, turns a simpler saucy curry into tender, browned, caramelized mouthwatering goodness.

My mom, until she recently retired, was a registered nurse who worked the night shift for 30 something years. On some evenings when she was sleeping before her shift our dad would take her left over curry and fry it up like this for dinner. K, my husband calls this "boonjay" beef, not sure how it's spelled but that's how it sounds when he says it. "Boonjay" is the Guyanese word he uses for dry fried curry.

Typically this Kerala style beef is fried with onions, garlic, ginger, curry leaves, spices and slices of fresh coconut. I left out the coconut when I made it today simply because I didn't have any on hand. But the addition of coconut is authentic and adds a nice sweet and nutty flavor to the dish. So if you have coconut be sure to add it.

You'll need a pressure cooker for this recipe.


Ingredients
1 lb. cubed boneless organic beef chuck or sirloin
2 teaspoons ground coriander
1/4 teaspoon chili powder
1/4 teaspoon garam masala
1/4 teaspoon turmeric
1/4 teaspoon ground fennel seeds
1/4 teaspoon black pepper
1/2 teaspoon salt
1 inch piece of cinnamon
2 cardamom pods bruised
1/4 cup water
Coconut oil or canola oil
1 generous pinch of mustard seeds
1 small onion sliced thin
1 teaspoon ginger minced fine
3 large garlic cloves minced fine
2 green chilies chopped
1/2 tomato sliced thin
10 curry leaves
2 inch piece of coconut sliced thin

Directions
Season cubed beef with the coriander, chili powder, garam masala, ground fennel, turmeric, black pepper, salt, cinnamon, and cardamom. Mix together with water and pressure cook according to your pressure cooker directions until the beef is tender. Heat enough oil to cover the bottom of a frying pan large enough to hold this amount of beef. When the oil is hot add the mustard seeds. When mustard seeds begin to crackle and pop, add the onions, ginger, garlic, green chili, curry leaves and coconut and continue to fry until the onions become translucent. Add the beef and fry together with other ingredients. As the water begins to cook away, add the thinly sliced tomato. Continue to fry these ingredients until all the water has cooked away and beef begins to form a light crust. Taste for salt. Fry the beef as dry as you like but be careful not to burn. Serve with rice or Indian bread.


Sunday, February 28, 2010

Lady's Finger


Today I have a tip for anyone who likes fried okra.

For those who are not familiar it's a green fruit which is typically used as a vegetable, also known as "lady's finger" in some parts of the world. If you're from the US, you know it as an ingredient in gumbo. They vary in size but generally they're about the size of your finger, green and slightly fuzzy on the outside. Their insides contain many seeds and a thick clear liquid. Because of this liquid, okra gets very slimy if not handled carefully after it's been cut or sliced up.

My mother always cooked okra in one of two ways, she either turned it into a curry or sautéed them. Both preparations are typical in Kerala cuisine. I prefer it sautéed or as I like to call it "fried" because I'll sauté it until they're slightly crisp.

Ideally I prefer to use fresh okra, but our local stores don't always have it. When this happens I buy them frozen. They come in the freezer section of most grocery stores frozen whole or cut. For the recipe that follows here use the cut kind. When I use fresh okra I find that my okra sautés nicely without getting too slimy and the end result tastes so much better. However with frozen okra the slime factor coupled with the water content from being frozen result in a mushy problem when trying to fry. So I've come up with a solution.

Just spread your frozen-cut okra out in a thin layer on a baking sheet and bake it in a 400 degree oven for half an hour. Keep a watch over them so they don't burn as your oven may be different than mine. The okra will be defrosted and will have dried out enough to make for easy sautéing. In my opinion fresh okra tastes so much better in this recipe because as the okra sautés they take on the flavors of the sweet caramelized onions and garlic much more. However, frozen okra is a good stand-in when I need it.

In our house we like to have okra fried this way as one of many accompaniments to go with dal and rice.


Ingredients
1 lb. bag frozen cut okra dried for half an hour in 400 degree oven
Canola or olive oil -enough to coat bottom of your frying pan for sautéing
Half an onion diced
4 garlic cloves minced
1/4 teaspoon cumin seeds
Red pepper flakes or 1-2 fresh green chilis sliced lenghtwise (use what you can tolerate)
Salt

Directions
Heat oil in pan and add mustard seeds. When mustard seeds begin to crackle and pop add cumin seeds stir them around until cumin seeds turn slightly golden and give off an aroma. Add onion, sauté with a pinch or two of salt. When onions start to become translucent add the garlic and red pepper flakes. Sauté these together for a couple of minutes then add the okra and continue to sauté. Season with salt as you sauté. Remember to taste as you cook and add salt according to your taste. Continue to fry this together until the okra reaches the consistency you like. Keep in mind that the measurements I have used are approximations. You can adjust them as you like.

Tuesday, February 23, 2010

Nice and Hot with Milk and Honey


Are you wondering why there is a bird perched on top of my teapot? It's a teapot drip catcher.

This past fall the morning after my sister and I returned from a short trip to Paris, we decided to have breakfast at Alice's Tea Cup in Manhattan, NY. It was sort of a celebratory morning for me because I had just returned from my first trip to Europe and I was celebrating being able to eat a big breakfast again and more importantly to have some tea. Don't get me wrong I really enjoyed Paris and the food! But the entire time I was there I was craving tea. Tea the way I like it, nice and hot, strong with milk and honey. When at home I have to have atleast one cup of tea before the day is over or my day is just not complete. I had tea several times while I was in Paris but for some reason it just didn't do it for me. I had bad tea luck in Paris :( The tea was always either weak or luke warm, just blah. So back to Alice's Tea Cup, we had a great breakfast there that morning and I finally got my tea. Not just a cup of tea but my own individual pot of tea! And the tea was just the way I wanted it, strong, nice and hot with milk and honey. Here's a picture of my pot of tea from Alices Tea Cup:


See that bird on top of the purple tea pot? That's where I first saw this ingenious invention, the teapot drip catcher. I thought it was the cutest thing and had mentioned to my sister that I need to get one of my very own for my teapot at home. My sister on a later trip to Alice's Tea Cup discovered that they had these cute drip catchers for sale there. She very kindly purchased one each for both of us. And now I have one of my very own!


By the way, notice how my cats are trying to steal the spotlight by getting in my shots.

Monday, February 22, 2010

In-laws' Chicken Stew


What to make for dinner? This question creeps into my head sometimes as soon as I wake up in the morning and most days around 4pm as my work day is drawing to a close. The answer often depend on what ingredients I have in my pantry / fridge / freezer, what I think K may like that day or how much energy I have left in me to cook.  For tonight's dinner I made my in-laws' chicken stew. I had all the necessary ingredients available, I was tired but managed to gather up the energy to cook and K always appreciates this chicken stew.  K's family is Guyanese American, and according to him this Guyanese chicken stew was made pretty frequently by his parents when he was growing up. I've had it a few times prepared by my father-in-law and I've watched him prepare it maybe once. I'm not sure if this recipe is authentic. Fortunately K says mine tastes very close to his dad's. I've used scotch bonnet pepper because it's readily available here. My in-laws typically use a little red berry-looking pepper they call the wiri wiri pepper. K likes to have his stew with some Guyanese pepper sauce made from the wiri wiri pepper. Here's some more info on the wiri wiri pepper from Meroza's blog.  And here is a beautifully presented explanation on chilis by Cynthia of Tastes Like Home.


Ingredients
2 lbs. chicken thighs skinned, cleaned and chopped half
2 tablespoons canola oil
1 medium sized onion sliced thin
3 garlic cloves minced
¼ scotch bonnet pepper, minus the seeds
1 teaspoon sugar
~ 1 teaspoon salt
¼ teaspoon ground black pepper
2 Tablespoons tomato paste
2 plum tomatoes
1 cup hot water
3 potatoes peeled and cut into pieces about the same size as chicken pieces.
4 scallions chopped

Directions
Heat oil in heavy bottom pot at a medium flame.  Sauté onions, garlic and scotch bonnet pepper until onion is translucent.  Season with a generous pinch of salt and one teaspoon of sugar.  Continue to sauté a few more seconds.  Add chicken and begin to mix and fry with onion mixture.  Adjust the flame as you go to prevent sticking. Season with remainder of salt and black pepper.  Continue to fry the chicken a few minutes or until lightly browned.  Add two tablespoons of tomato paste and mix to coat the chicken and continue to fry.  Add the sliced tomatoes and fry until the tomatoes soften and cook down.  Continue to stir to prevent the tomatoes from sticking to the bottom.  When the oil and tomato begins to separate add the water, mix, and turn the flame up to high.  When the stew begins to boil, cover with a lid and lower the flame to low.  Cook for about 45 minutes or until chicken is cooked through.  This part is tricky; add the potatoes and the scallions when you think there is about 15-20 minutes of cooking time left.  The potatoes should be fork tender but not mushy.  Serve over rice.

Sunday, February 21, 2010

Sunday Morning Pancakes


These pancakes are so thick and fluffy that I can only eat two. The stack of three in the picture above was devoured by my husband K. This recipe is adapted from a Martha Stewart "fluffy pancakes" recipe but I've made a few changes. Martha's calls for powdered milk plus water, I prefer to use nonfat milk. Hers also calls for double the amount of baking powder than I've used. I've added vanilla extract which pairs so nicely with maple syrup. Try using the best quality vanilla extract you can find. I used Madagascar Bourbon Vanilla Extract.


Ingredients
1 cup all purpose flour
1/8 cup granulated sugar
1/8 teaspoon salt
1 tablespoon baking powder
1 egg
1/4 teaspoon vanilla extract ( use a good quality one for best results)
2 tablespoons melted butter ( I used salted)
3/4 cup nonfat milk

Makes 6 pancakes

Directions
Mix all of the above ingredients together lightly. Do not beat or blend smooth. Simply stir together until the ingredients are incorporated and let it remain a bit lumpy. Then go ahead and cook your pancakes on a well greased cast iron griddle or lightly greased nonstick griddle. Serve with 100% pure maple syrup.

Saturday, February 20, 2010

Quick Lamb Curry for Two


While perusing the meat department at the market yesterday I spotted boneless lamb for stew. I decided that it would be perfect for a quick lamb curry. Since there’s only K and me, the .75 lb. portion was perfect. Normally when I make lamb curry I use bone in meat, however for this “quick” version the boneless lamb worked really well. The recipe here is my own creation resulting from making it many times and tweaking it each time. K says this version of lamb curry tastes very similar to the kind you would get at Indian restaurants. So for anyone out there who likes Indian takeout, you can make your own takeout lamb curry…try it!!!

You’ll need a pressure cooker for this recipe.


Ingredients
Marinade:
.75 lb cubed lamb for stew
2 teaspoons ground coriander seeds
¼ teaspoon ground fennel seeds
¼ teaspoon chili powder ( I used extra hot)
1/8 teaspoon turmeric
¼ teaspoon toasted ground cumin seeds
¼ teaspoon garam masala
1/8 teaspoon ground black pepper
¼ teaspoon salt
2 tablespoons yogurt
¼ teaspoon canola oil
½ green chili sliced lengthwise

Curry:
2 tablespoons canola oil
2 green cardamom pods bruised
~ 1 inch piece of cinnamon
¼ teaspoon cumin seeds
1 generous pinch of mustard seeds
½ large onion sliced thin
1 teaspoon ginger minced finely
3 cloves garlic minced finely
¼ cup water
1 tablespoon tomato paste
Chopped cilantro
Salt to taste

Directions:
Combine all the ingredients for the marinade and then marinate the lamb pieces in the refrigerator for anywhere from 15 minutes to 4 hours. The longer the marinating time, the more time you allow for the yogurt to tenderize the lamb.

Heat 2 tablespoons of oil in a heavy bottom pot or directly in the pressure cooker. Add the mustard seeds. When the seeds begin to sputter add the cardamom pods, cinnamon and cumin seeds. Let toast for a few seconds, and be careful not to let it burn. Add the sliced onions and a pinch of salt, and continue to fry until the onions begin to look translucent. Add the minced ginger and garlic and continue to fry until the tips of the onion slices begin to turn golden brown. Add the marinated lamb into the pot and mix into the onion mixture. Mix these around for about a minute to let the spices brown a bit. Add the 1/4 cup water then put the pressure cooker lid on and continue to cook the lamb according to your pressure cooker directions. When the lamb is cooked and you’ve opened the pressure cooker lid the lamb pieces should be fork tender and they should be swimming in a thin brown curry. For the final step put the curry back on a low to medium flame and add a table spoon of tomato paste. Continue to mix and simmer the curry until the sauce reaches the consistency you like. I like a thicker sauce that coats rice or is easy to be scooped up with Indian breads. Don't forget to taste and add more salt if you feel it needs it. Add some chopped coriander leaves and heat through for a few seconds and the curry is done.


Tuesday, February 16, 2010

Shrimp Arrabiata


Last weekend I had dinner at Sojourn restaurant in Manhattan, NY. Several of their small plates were sampled but two stood out for me. I really enjoyed their lobster arrabiata with squid ink pasta and their braised short rib over creamy polenta. Inspired by Sojourn's lobster arrabiata, I made my own version of shrimp arrabiata for dinner tonight. I used shrimp instead of lobster because that’s what I had in my freezer. Unfortunately, I was unable to find squid ink pasta so I used regular linguini which turned out just as good. This sauce is meant to be spicy hot. Here’s how I made it:


Ingredients
½ lb. linguini
~ 20 large shrimp –peeled, deveined and washed
28 ounce can peeled whole tomatoes – pureed
½ onion finely minced
7 cloves garlic finely minced
½ - 1 teaspoons crushed red pepper flakes *
Parsley roughly chopped
Basil roughly chopped or torn
Olive oil
3/4 teaspoon Sugar
½ tablespoon butter (optional)
Salt
pepper

Serves 2

* The amount of red pepper flakes depends on how hot you want it, I used 1 teaspoon which was HOT, but I like it that way. If you prefer less heat reduce this to half a teaspoon.

Directions:
Cook the pasta according to your preference and keep warm. I like to add some salt to the water before boiling the pasta and prefer to cook pasta al dente. You may want to cook the pasta while the sauce is simmering.

Puree the tomatoes until smooth.

Heat about two tablespoons extra virgin olive oil in a medium sized pot. Sauté the minced onion and 4 cloves of minced garlic until soft. Add teaspoon red pepper flakes and continue to sauté for a few more seconds. Season with a generous pinch of salt. Add the tomato puree, ½ a teaspoon of salt, sugar, two to three shakes of ground black pepper and a handful of fresh parsley roughly chopped and bring to a boil. When it comes to a boil turn the heat down to a medium low flame and continue to simmer for 15 minutes. After 15 minutes add about 4 -5 basil leaves roughly chopped or torn by hand, then continue to simmer for 15 minutes longer. Remember to taste as the sauce cooks, you may want to add more or less salt according to your taste. After the last 15 minutes remove from the flame and keep aside.

Heat about 1 tbsp of olive oil in a medium size nonstick skillet. Sauté 3 cloves of minced garlic until it gives off an aroma and is soft…almost caramelized but be careful do not burn it. Add in the shrimp at this point and sauté. Add about a tablespoon of chopped parsley. Season with salt and pepper. Add butter and continue to sauté the shrimp until cooked through. Don’t overcook! At this point add half the arrabiata sauce to the shrimp, stir together and let this simmer for a few seconds. Toss the warm pasta in with the shrimp and arrabiata sauce. Serve garnished with chopped parsley. Freeze and save the balance of the sauce for another dish. I hope you’ll try it and enjoy it as much as I did!

Monday, February 15, 2010

Green Drink


You know Dr. Oz of Oprah fame? Well he swears by this “green drink”. You can find the recipe online, just Google it. It contains apples, carrots, ginger, parsley, cucumber, celery, lemon, and spinach. Anyway, I decided I would try it for myself. Actually the plan was to have a glass every morning as suggested by Dr. Oz. I did have it one morning last week, but it turned out to be too much effort in the morning though. You have to wash and clean all the fruits and veggies, and then you have to clean out your juicer if you want it to continue working smoothly and looking brand spanking new forever. All this before heading out to work in the morning…I’m not that organized to keep it up. However, today is a light work day, so I made some this morning. I did not follow an exact recipe, I just juiced two apples, two carrots, 1/3 of a cucumber, a very large handful of spinach, half a lemon, a piece of ginger, a small bunch of parsley, and three sticks of celery. You’ll get two wine glasses full from this amount of fruits and veggies.


By the way, don’t do what I did…remember to place a glass under the juice spout.


Here’s what it looks like. I know what you’re thinking...that it looks like swamp water, right?


Well it doesn’t taste like swamp water. It’s not that bad actually. Maybe I'll add more fruit to the mix to make it more palatable. I would definitely have it every morning if prep and clean up wasn’t such a hassle...even with an easy to clean juicer like mine. I don’t think it would be safe to make it ahead and keep a batch for later either. Oh, well.

If anyone out there is doing this every morning, I’d love to hear from you.

Sunday, February 14, 2010

The Best Laid Plans and the Valentine’s Day Beef Stew


My first entry is in honor of my wonderful husband, K.

OK so how many of you out there have spouses/partners who do not cook for whatever reason? Well K is one of them, but today is Valentine's Day and my birthday to boot. We decided to stay in tonight because we went out to dinner last night. He asked me what I’d like him to make for dinner. How sweet right? This from a guy who doesn’t cook. By the way, my Valentine’s Day gift to him is to leave him alone today and let him have time to himself. I know it sounds strange but he LOOOOVES his alone time.

Anyway, back to the dinner. I asked him to make something that he would like to have for dinner and expressed that I would be happy no matter what it is. He decided on beef stew, of course a man would want beef stew on Valentine's Day. But I was happy nevertheless, I don’t have to cook tonight after all. So me being the overly controlling, oldest child that I am, I helped him find a simple recipe from my collection of cookbooks. While he was out grocery shopping for some other essentials I laid out all the ingredients to make it as easy as possible for him to make this Valentine/Birthday dinner-stew. The recipe calls for “curry powder”. We don’t use store-bought “curry powder” in our house so I even prepared a mix of spices which would be appropriate for beef. I can only imagine what would have happened if he had to make his own spice mix. The whole plan would have been aborted, I’m sure.

homemade spice mix
Now, this all happened early in the afternoon. I figured I did all I could, I’d leave the rest to him and stay out of it. Around 5:30 pm just as I was thinking “I would have started on dinner by now if I was him”, I heard him going down to the kitchen.

I heard pots and pans noises coming from down there and shortly thereafter I heard him running back upstairs. He says the beef was supposed to be marinated. OH NO!? I failed to tell him to read the recipe in advance! What to do?!! What to do?!!! He says he’s going to make the “OTHER” recipe. OH NO!? What “OTHER” recipe?! I had shown him several other recipes earlier in the afternoon, which one was he referring to? I asked if he needed help, and he said “No, thanks” and ran back downstairs. For a few moments I paced back and forth. Should I go down there? Should I stay here? It took all the will power I could muster to stay out of the kitchen and not completely take over as I usually do. Even when I heard him shout “OH SHIT”. But, I did it! I did not interfere.


He chose a recipe from a Good Housekeeping cookbook, not a book I would have chosen. I mean I picked that cookbook out of a clearance bin at the bookstore, it was practically free, and I have never made a single recipe from it. Oh, AND he improvised. Imagine that my husband who does not cook is taking liberties with the recipe. He threw in the spice mix which I had prepared for the first recipe. He did come back upstairs a few times during the cooking process, he looked a bit stressed out and unsure, shrugged his shoulders and said “I hope it comes out OK”. So how did it turn out?

Well... We ate at 10pm, that's how long it took. I was starving and beginning to feel a bit faint. I was too tired to even take a picture of it or include the recipe he used, sorry.

I have to say, I am very proud of my dear husband. What a loving gesture to step out of his comfort zone and do this for me on my birthday.

saffron and cardamom

Hello there! This blog began at the urging of my younger sister…tired of me calling her up nearly every week to report what I’ve cooked, how I cooked it and how lovely it turned out. I’m not that great of a cook, just a home cook and a wanna-be foodie. I’ve procrastinated starting this blog for quite some time because from what I can see of the food bloggers whom I follow, they all write really well, take beautiful pictures and seem very knowledgeable. I just don’t think I’ll fit into this very sophisticated food blogging world, but am going to give it a try anyway.

Here’s a little about me…I’m a 30 something Indian-American, born in Kerala, India and raised in NY. My husband and I live in Newburgh, NY with our two feline dependents. I can’t say I LOVE the process of cooking, but I do enjoy cooking for others and I do love to eat. When I cook, it’s usually Asian (mainly Indian), Guyanese, Italian, Spanish, or good old American…but I’ll try anything.

So here at my blog you’ll find my attempts at duplicating meals I’ve had at restaurants that I absolutely loved, recipes from cookbooks/other bloggers/friends/family, nostalgic trials at recreating mom’s Kerala dishes, ambitious trials at recreating Guyanese dishes which are nostalgic to my husband, in addition to some of my own everyday staples. Please don’t expect daily entries (I have a day job), don’t expect recipes to be “authentic” or for me to use exact measurements all of the time, and PLEASE, PLEASE, PLEASE forgive bad writing, any typos, misspelled words or poorly lit/focused/framed photographs. FYI, I don’t have a fancy camera, just a Lumix. Remember, this will be a work in progress… Wish me luck!!